Aiursoft Template Tutorial - Step 5 - 将数据保存到数据库
接下来,我们将继续扩展上面的例子,允许用户保存他们的 markdown 文档,并在之后重新编辑甚至分享它们。为此,我们需要修改控制器和视图,以便用户可以创建、查看、编辑和删除他们的文档。
Step 5.1 保存并更新用户的文档
首先,我们需要修改 ./src/MyOrg.MarkToHtml/Controllers/HomeController.cs 文件,添加必要的 using 语句:
using System.ComponentModel.DataAnnotations;
using Aiursoft.CSTools.Tools;
using MyOrg.MarkToHtml.Models.HomeViewModels;
using MyOrg.MarkToHtml.Services;
using Aiursoft.UiStack.Navigation;
using Microsoft.AspNetCore.Authorization;
using Microsoft.AspNetCore.Identity;
using Microsoft.AspNetCore.Mvc;
using Microsoft.EntityFrameworkCore;
using MyOrg.MarkToHtml.Entities;
然后我们调整其构造方法,支持日志、数据库和用户管理器:
public class HomeController(
    ILogger<HomeController> logger,
    UserManager<User> userManager,
    TemplateDbContext context,
    MarkToHtmlService mtohService) : Controller
接下来我们重构 Index 方法,对于未认证的用户,我们直接渲染成 HTML,以保持核心功能不变。而对于已经认证的用户,我们则直接在数据库中添加或更新他们的文档,然后交给具体的 Edit 方法来渲染。
将 Index 方法修改为:
[HttpPost]
[ValidateAntiForgeryToken]
public async Task<IActionResult> Index(IndexViewModel model)
{
    if (!ModelState.IsValid)
    {
        return this.StackView(model);
    }

    var userId = userManager.GetUserId(User);
    if (User.Identity?.IsAuthenticated == true && !string.IsNullOrWhiteSpace(userId))
    {
        // If the user is authenticated, this action only saves the document in the database. And it's `edit` action to render it.
        // And go to the edit page.
        logger.LogTrace("Authenticated user submitted a document with ID: '{Id}'. Save it to the database.",
            model.DocumentId);
        var documentInDb = await context.MarkdownDocuments
            .FirstOrDefaultAsync(d => d.Id == model.DocumentId && d.UserId == userId);
        if (documentInDb != null)
        {
            logger.LogInformation("Updating the document with ID: '{Id}'.", model.DocumentId);
            documentInDb.Content = model.InputMarkdown.SafeSubstring(65535);
            documentInDb.Title = model.Title;
        }
        else
        {
            logger.LogInformation("Creating a new document with ID: '{Id}'.", model.DocumentId);
            model.DocumentId = Guid.NewGuid();
            var newDocument = new MarkdownDocument
            {
                Id = model.DocumentId,
                Content = model.InputMarkdown.SafeSubstring(65535),
                Title = model.InputMarkdown.SafeSubstring(40),
                UserId = userId
            };
            context.MarkdownDocuments.Add(newDocument);
        }

        await context.SaveChangesAsync();
        return RedirectToAction(nameof(Edit), new { id = model.DocumentId });
    }
    else
    {
        // If the user is not authenticated, just show the result.
        logger.LogInformation(
            "An anonymous user submitted a document with ID: '{Id}'. It was not saved to the database.",
            model.DocumentId);
        model.OutputHtml = mtohService.ConvertMarkdownToHtml(model.InputMarkdown);
        return this.StackView(model);
    }
}
当然,完成上面的修改后,你会注意到几个错误,包括 model.DocumentId、model.Title 找不到等。别担心,我们立刻去更新 IndexViewModel。
编辑文件 ./src/MyOrg.MarkToHtml/Models/HomeViewModels/IndexViewModel.cs,添加必要的属性:
[Required(ErrorMessage = "Something went wrong, please try again later.")]
public Guid DocumentId { get; set; } = Guid.NewGuid();

public bool IsEditing { get; init; }

[MaxLength(100)]
public string? Title { get; set; }
其中,DocumentId 用于标识用户的文档。对于每个新 GET 请求,我们每次都会生成一个新的 ID。为了确保反复提交编辑过程中这个Id不会变,我们需要在视图中将其作为隐藏字段提交。
修改 ./src/MyOrg.MarkToHtml/Views/Home/Index.cshtml,在 <form> 标签内添加以下代码:
<form asp-action="Index" method="post" id="markdown-form">
    <input type="hidden" asp-for="DocumentId" />
    ... Other existing code ...
这样在每次提交的时候,都会将 DocumentId 一起提交到服务器端。
Step 5.1.1 理解保存和更新逻辑 (可选)
阅读服务端的代码,其中核心逻辑是:
var documentInDb = await context.MarkdownDocuments
    .FirstOrDefaultAsync(d => d.Id == model.DocumentId && d.UserId == userId);
if (documentInDb != null)
{
    logger.LogInformation("Updating the document with ID: '{Id}'.", model.DocumentId);
    documentInDb.Content = model.InputMarkdown.SafeSubstring(65535);
    documentInDb.Title = model.Title;
}
else
{
    logger.LogInformation("Creating a new document with ID: '{Id}'.", model.DocumentId);
    model.DocumentId = Guid.NewGuid();
    var newDocument = new MarkdownDocument
    {
        Id = model.DocumentId,
        Content = model.InputMarkdown.SafeSubstring(65535),
        Title = model.InputMarkdown.SafeSubstring(40),
        UserId = userId
    };
    context.MarkdownDocuments.Add(newDocument);
}
对于未认证用户,我们直接渲染成 HTML,以保持核心功能不变。对于已认证的用户,我们要支持保存和更新他们的文档。所以第一次提交时,我们可以帮用户保存到数据库,并建立 DocumentId 和 UserId 的关联。之后用户再次提交时,我们就可以根据 DocumentId 和 UserId 来找到对应的文档,并更新它的内容和标题。
我们的代码是:
用户的 DocumentId 如果不存在或不属于这个用户,那么不会信任用户提交的 DocumentId,而是重新生成一个新的 ID 然后插入数据库。这样可以防止用户恶意提交别人的 DocumentId 来修改别人的文档。

而如果用户提交的 DocumentId 存在并且属于当前用户,那么就只更新这个文档的内容和标题。具体的 Markdown 渲染过程则交给了 `Edit` 方法来处理。现在,我们创建 `Edit` 方法。
Step 5.2 创建编辑文档的页面
在 ./src/MyOrg.MarkToHtml/Controllers/HomeController.cs 文件中,添加以下代码:
[Authorize]
public async Task<IActionResult> Edit([Required][FromRoute]Guid id)
{
    var userId = userManager.GetUserId(User);
    var document = await context.MarkdownDocuments.FirstOrDefaultAsync(d => d.Id == id && d.UserId == userId);

    if (document == null)
    {
        return NotFound("The document was not found or you do not have permission to edit it.");
    }

    var model = new IndexViewModel
    {
        DocumentId = document.Id,
        Title = document.Title,
        InputMarkdown = document.Content ?? string.Empty,
        OutputHtml = mtohService.ConvertMarkdownToHtml(document.Content ?? string.Empty),
        IsEditing = true
    };

    return this.StackView(model: model, viewName: nameof(Index)); // Reuse the Index view for editing.
}
在上面的代码中,我们使用了 [Authorize] 属性来确保只有认证用户才能访问这个方法。
我们根据传入的 id 参数,从数据库中查询对应的文档。如果找不到文档,或者文档不属于当前用户,就返回 404 错误。
ASP.NET Core 会自动将路由参数绑定到方法参数上。如果参数使用了
[FromRoute]属性,表示这个参数来自路由。而id这个参数,则来自于 URL 中的{id}部分。在默认行为下,它的路由遵循控制器的路由规则,例如/Home/Edit/{id}。也就是说,如果用户访问/Home/Edit/1234,那么id参数就会被绑定为1234。
我们之前的 Index 已经可以将已经认证的用户的文档保存到数据库中,并且在保存后重定向到 Edit 方法来渲染文档。因此,我们可以复用 Index 视图来显示编辑页面。
考虑到创建和编辑我们共享了同一个视图,我们在 IndexViewModel 中添加了一个 IsEditing 属性,用于区分当前是创建还是编辑状态。
例如,我们可以在编辑模式下,除了允许编辑文档外,还可以允许用户编辑文档的标题。我们可以在视图中添加一个输入框,用于编辑标题。
修改 ./src/MyOrg.MarkToHtml/Views/Home/Index.cshtml 文件,在左侧的 Markdown 输入区域上方,添加以下代码:
@* Left Column: Markdown Input *@
<div class="col-lg-6 d-flex">
<div class="card flex-fill">
<div class="card-header">
<h5 class="card-title mb-0">
<i class="align-middle" data-lucide="markdown"> </i>
@Localizer["Markdown Input"]
</h5>
</div>
<div class="card-body p-2">
@* Add this block for editing title if in editing mode *@
@if (Model.IsEditing)
{
<div class="mb-3">
<label asp-for="Title" class="form-label">@Localizer["Document Title (optional)"]</label>
<input asp-for="Title" class="form-control form-control-lg" placeholder="@Localizer["Document Title (optional)"]"/>
<span asp-validation-for="Title" class="text-danger"></span>
</div>
}
<textarea asp-for="InputMarkdown" class="form-control" id="markdown-editor"
placeholder="@Localizer["Type your Markdown here..."]"></textarea>
<span asp-validation-for="InputMarkdown" class="text-danger"></span>
</div>
</div>
</div>
这样,在编辑模式下,用户可以看到一个标题输入框,可以为他们的文档添加一个标题。
现在可以运行应用以及测试功能了。
现在,你可以运行应用,注册一个新用户,并测试创建和编辑文档的功能。你应该能够创建新的文档,并编辑它们的标题和内容。
每次编辑后,地址栏的路径都会变成例如 /Home/Edit/{DocumentId} 的形式,表示你正在编辑一个已经存在的文档。
同时,检查数据库中的 MarkdownDocuments 表,应该能够看到你创建和编辑的文档已经被保存到数据库中。
当然,最核心的功能,也就是查看自己的文档列表,仍然没有实现。我们将在下一步中实现这个功能。
Step 5.3 创建用户文档列表页面
用户的文档列表页面将提供给用户查看自己的文档历史记录,并允许他们选择一个文档进行编辑或删除。
在 ./src/MyOrg.MarkToHtml/Controllers/HomeController.cs 文件中,添加以下代码:
[Authorize]
[RenderInNavBar(
    NavGroupName = "Features",
    NavGroupOrder = 1,
    CascadedLinksGroupName = "Home",
    CascadedLinksIcon = "history",
    CascadedLinksOrder = 2,
    LinkText = "My documents",
    LinkOrder = 2)]
public async Task<IActionResult> History()
{
    var userId = userManager.GetUserId(User);
    var documents = await context.MarkdownDocuments
        .Where(d => d.UserId == userId)
        .OrderByDescending(d => d.CreationTime)
        .ToListAsync();

    var model = new HistoryViewModel
    {
        MyDocuments = documents
    };
    return this.StackView(model);
}
它的功能正是从数据库中查询当前用户的所有文档,并按创建时间降序排列。然后将这些文档传递给视图进行渲染。
其中,[RenderInNavBar] 属性用于将这个方法渲染到导航栏中。这样用户就可以通过导航栏访问他们的文档列表。
创建文件 ./src/MyOrg.MarkToHtml/Models/HomeViewModels/HistoryViewModel.cs,添加以下代码:
using Aiursoft.UiStack.Layout;
using MyOrg.MarkToHtml.Entities;

namespace MyOrg.MarkToHtml.Models.HomeViewModels;

public class HistoryViewModel : UiStackLayoutViewModel
{
    public HistoryViewModel()
    {
        PageTitle = "My Documents History";
    }

    public IEnumerable<MarkdownDocument> MyDocuments { get; set; } = new List<MarkdownDocument>();
}
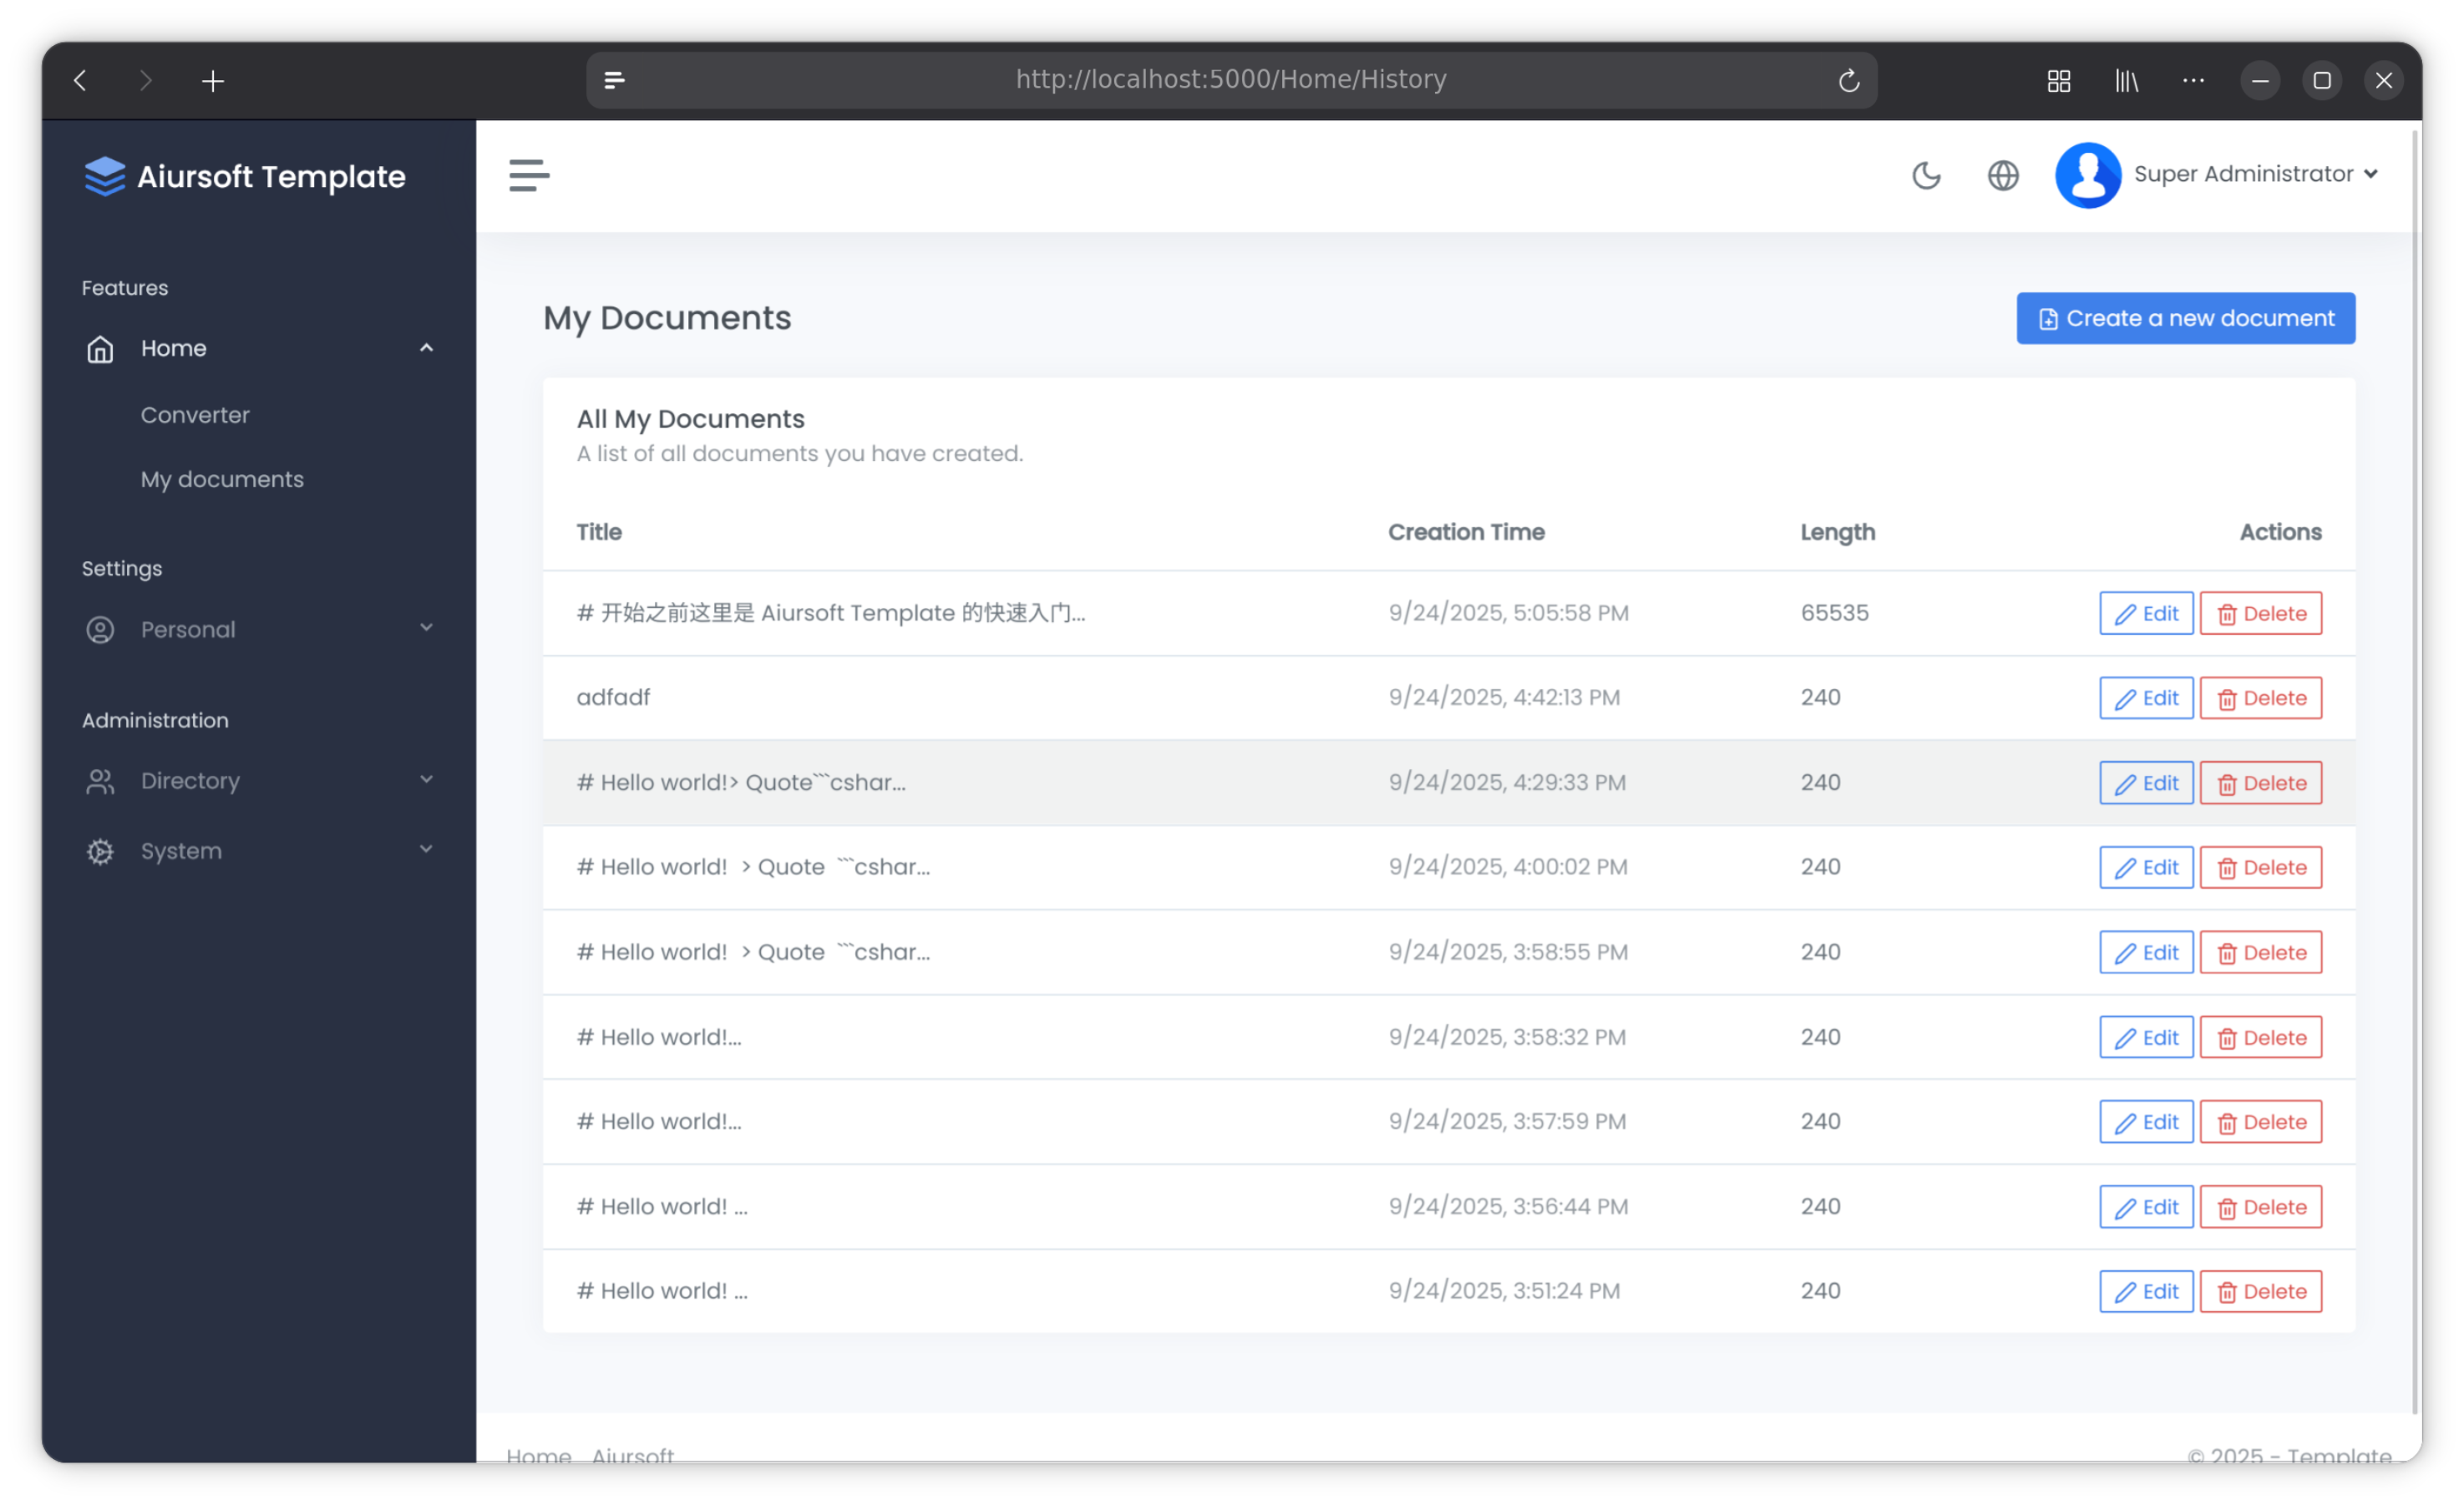
创建文件 ./src/MyOrg.MarkToHtml/Views/Home/History.cshtml,添加以下代码:
@using Aiursoft.WebTools
@model MyOrg.MarkToHtml.Models.HomeViewModels.HistoryViewModel
@inject IViewLocalizer Localizer

<style>
    .clickable-row {
        cursor: pointer;
    }
</style>

<div class="row mb-2 mb-xl-3">
    <div class="col-auto d-none d-sm-block">
        <h3>@Localizer["My Documents"]</h3>
    </div>

    <div class="col-auto ms-auto mt-n1">
        <a asp-controller="Home" asp-action="Index" class="btn btn-primary">
            <i class="align-middle" data-lucide="file-plus"></i> @Localizer["Create a new document"]
        </a>
    </div>
</div>

<div class="card">
    <div class="card-header">
        <h5 class="card-title">@Localizer["All My Documents"]</h5>
        <h6 class="card-subtitle text-muted">@Localizer["A list of all documents you have created."]</h6>
    </div>
    <div class="table-responsive">
        <table class="table table-hover mb-0">
            <thead>
            <tr>
                <th>@Localizer["Title"]</th>
                <th>@Localizer["Creation Time"]</th>
                <th>@Localizer["Length"]</th>
                <th class="text-end">@Localizer["Actions"]</th>
            </tr>
            </thead>
            <tbody>
            @foreach (var doc in Model.MyDocuments)
            {
                <tr class="clickable-row" data-href="@Url.Action("Edit", new { id = doc.Id })">
                    <td>
                        @if (string.IsNullOrWhiteSpace(doc.Title))
                        {
                            <label class="text-muted">(no title)</label>
                        }
                        else
                        {
                            @doc.Title
                        }
                    </td>
                    <td>
                        <label class="text-muted" data-utc-time="@doc.CreationTime.ToHtmlDateTime()"></label>
                    </td>
                    <td>@(doc.Content?.Length ?? 0)</td>
                    <td class="text-end">
                        <a asp-action="Edit" asp-route-id="@doc.Id" class="btn btn-sm btn-outline-primary">
                            <i class="align-middle" data-lucide="edit-2"></i> @Localizer["Edit"]
                        </a>
                        <a asp-action="Delete" asp-route-id="@doc.Id" class="btn btn-sm btn-outline-danger">
                            <i class="align-middle" data-lucide="trash-2"></i> @Localizer["Delete"]
                        </a>
                    </td>
                </tr>
            }
            </tbody>
        </table>
    </div>
</div>

@* ReSharper disable once Razor.SectionNotResolved *@
@section scripts {
    <script>
        document.addEventListener("DOMContentLoaded", function () {
            const rows = document.querySelectorAll(".clickable-row");
            rows.forEach(row => {
                row.addEventListener("click", function (event) {
                    const target = event.target;
                    // Prevent navigation if a link or button was clicked inside the row
                    if (!target.matches('a, a *, button, button *')) {
                        window.location.href = row.dataset.href;
                    }
                });
            });
        });
    </script>
}
这个视图使用了一个表格来显示用户的所有文档。每一行显示文档的标题、创建时间、内容长度以及操作按钮(编辑和删除)。点击行可以导航到编辑页面。
注意,其中我们使用了一个技巧:data-utc-time 属性来存储 UTC 时间。Aiursoft Template 自带的 JavaScript 会自动将其转换为用户本地时间并显示。还记得我们在设计实体的时候是如何定义这个 CreationTime 属性的吗?当时的代码是:
public DateTime CreationTime { get; init; } = DateTime.UtcNow;
所以这个实体本身创建的时候,就已经将当时的 UTC 时间存储在数据库里了。而转换为当地时区是靠 JavaScript 在用户的设备上实现的。这样可以确保无论用户来自哪个时区,显示的时间都是当地的时间。
最后,为了方便用户在编辑页面能够返回到他们的文档列表,我们在 ./src/MyOrg.MarkToHtml/Views/Home/Index.cshtml 文件中,找到提交按钮,在它左侧添加一个返回按钮,并且对于已经认证的用户,强调转换按钮有保存的功能。修改如下:
@* Submit Button Row *@
<div class="row mt-3">
<div class="col text-center">
@* Add the back button *@
@if ((User.Identity?.IsAuthenticated ?? false) && Model.IsEditing)
{
<a asp-action="History" class="btn btn-outline-secondary btn-lg mr-2">
<i class="align-middle" data-lucide="file-text"> </i>
@Localizer["My Documents"]
</a>
}
<button type="submit" class="btn btn-primary btn-lg">
@if (User.Identity?.IsAuthenticated ?? false)
{
<i class="align-middle" data-lucide="check-circle"> </i>
@Localizer["Convert and save"]
}
else
{
<i class="align-middle" data-lucide="chevrons-right"> </i>
@Localizer["Convert to HTML"]
}
</button>
</div>
</div>
现在,不会再有错误了。你可以运行应用程序,在匿名模式下,只能创建并查看 HTML。而在登录后,你可以创建、编辑和查看你自己的文档列表。
默认用户是
admin,默认密码是admin123。
当然,我们还没有实现删除文档的功能。我们将在下一步中实现这个功能。
Step 5.4 实现删除文档的功能
在完成了创建、编辑、列表等功能后,删除自然已经是最后一个需要实现的功能了。到这里,我们已经熟练掌握了如何使用 Entity Framework Core 来操作数据库中的数据。删除文档的功能也不例外。你可以试试自己实现它,或者参考下面的代码。
在 ./src/MyOrg.MarkToHtml/Controllers/HomeController.cs 文件中,添加以下代码:
// GET: /Home/Delete/{guid}
[Authorize]
public async Task<IActionResult> Delete(Guid? id)
{
    if (id == null)
    {
        return NotFound();
    }

    var userId = userManager.GetUserId(User);
    var document = await context.MarkdownDocuments
        .FirstOrDefaultAsync(d => d.Id == id && d.UserId == userId);

    if (document == null)
    {
        // Document not found or user does not have permission.
        return NotFound();
    }

    return this.StackView(new DeleteViewModel
    {
        Document = document
    });
}

// POST: /Home/Delete/{guid}
[HttpPost, ActionName("Delete")]
[ValidateAntiForgeryToken]
[Authorize]
public async Task<IActionResult> DeleteConfirmed(Guid id)
{
    var userId = userManager.GetUserId(User);
    var document = await context.MarkdownDocuments
        .FirstOrDefaultAsync(d => d.Id == id && d.UserId == userId);

    if (document == null)
    {
        return NotFound();
    }

    context.MarkdownDocuments.Remove(document);
    await context.SaveChangesAsync();

    logger.LogInformation("Document with ID: '{Id}' was deleted by user: '{UserId}'.", id, userId);

    return RedirectToAction(nameof(History));
}
同时创建 ./src/MyOrg.MarkToHtml/Models/HomeViewModels/DeleteViewModel.cs 文件,添加以下代码:
using Aiursoft.UiStack.Layout;
using MyOrg.MarkToHtml.Entities;

namespace MyOrg.MarkToHtml.Models.HomeViewModels;

public class DeleteViewModel : UiStackLayoutViewModel
{
    public DeleteViewModel()
    {
        PageTitle = "Delete Document";
    }

    // This property will hold the document to be deleted, so the view can display its details.
    public MarkdownDocument Document { get; set; } = null!;
}
创建 ./src/MyOrg.MarkToHtml/Views/Home/Delete.cshtml 文件,添加以下代码:
@using Aiursoft.WebTools
@model MyOrg.MarkToHtml.Models.HomeViewModels.DeleteViewModel
@inject IViewLocalizer Localizer

<h1 class="h3 mb-3">@Localizer["Delete Document"]</h1>

<div class="row justify-content-center">
    <div class="col-lg-10 col-xl-8">
        <div class="card">
            <div class="card-header text-center">
                <i class="align-middle text-danger" data-lucide="shield-alert" style="width: 48px; height: 48px;"></i>
            </div>
            <div class="card-body">
                <div class="text-center">
                    <h2 class="h4 card-title fw-bold">@Localizer["Are you sure?"]</h2>
                    <p class="mb-3 text-muted">@Localizer["This action is irreversible. You are about to permanently delete the following document:"]</p>
                </div>

                <div class="list-group list-group-flush my-4">
                    <div class="list-group-item">
                        <div class="row">
                            <strong class="col-sm-3">@Localizer["Title"]</strong>
                            <div class="col-sm-9">
                                @if (string.IsNullOrWhiteSpace(Model.Document.Title))
                                {
                                    <label class="text-muted">(no title)</label>
                                }
                                else
                                {
                                    @Model.Document.Title
                                }
                            </div>
                        </div>
                    </div>
                    <div class="list-group-item">
                        <div class="row">
                            <strong class="col-sm-3">@Localizer["Creation Time"]</strong>
                            <div class="col-sm-9">
                                <label data-utc-time="@Model.Document.CreationTime.ToHtmlDateTime()" class="text-monospace"></label>
                            </div>
                        </div>
                    </div>
                </div>

                <div class="text-center">
                    <form asp-action="Delete" class="d-inline-block">
                        <input type="hidden" asp-for="@Model.Document.Id" />
                        <button type="submit" class="btn btn-danger">
                            <i class="align-middle me-2" data-lucide="trash-2"></i> @Localizer["Yes, delete this document"]
                        </button>
                    </form>
                    <a asp-action="History" class="btn btn-light">@Localizer["Cancel"]</a>
                </div>
            </div>
        </div>
    </div>
</div>
这个视图显示了一个确认删除的页面,列出了要删除的文档的标题和创建时间,并提供了确认和取消按钮。
结语
恭喜你完成了第五步!你现在已经成功地实现了一个完整的 CRUD(创建、读取、更新、删除)功能,允许用户创建、编辑、查看和删除他们的 Markdown 文档。
通过合理地使用 Entity Framework Core,你可以轻松地操作数据库中的数据,而不必担心手动编写 SQL 语句,也不必担心数据库结构与实体类不一致的问题。
在上面的过程中,我们巧妙的将创建和编辑共享了同一个视图,这样可以减少代码重复,提高代码的可维护性。同时我们还对于匿名用户和已经认证的用户做了不同处理,确保匿名用户可以匿名使用,而认证用户则可以享受更多的功能。
现在运行应用程序,尝试创建、编辑、查看和删除你的文档,体验一下完整的功能吧!